
Jamin and De’Etta’s Pizza Tips
If you want more info or photos or whatever – consider buying the download here and let Beverly Collins teach you the trade secrets. You receive an e-Book and a step by step video….plus about 1000 other "top secret" and "blue ribbon" recipes . We really believe this was worth it – as our family now likes the texture etc of our pizza and so we aren’t buying it at Papa Johns. This will save us at least 2K a year. (That info is for Mike because we had to buy a stone, screens and probably a pizza paddle – the oven singes your eye lashes).
First – I think any sauce or crust recipe that you enjoy will be fine (our favorite is below), as long as you use the flour she recommends and the technique. Once again, I was skeptical about this (like the spinach thing) but it really DOES make a difference.
Dough: High gluten, spring flour (grown in northern climates) is what she recommends. 14% protein/gluten or higher. Examples of this are Prairie Gold from Wheat MT or she recommends King Arthur as a good source – choose unbleached, high gluten flour (hard spring wheat).
 Forget bread making – make dough, divide into balls, oil dough, place in Ziploc or airtight container, let rise SLOWLY in fridge for 2 – 5 days. This gives a yummy flavor!!!
Add more oil or don’t knead for softer dough.
Don’t roll the dough. Put your handprint in the dough, start stretching dough out with your fingers from the middle. Tossing the dough helps stretch it too if you are adventuresome. Slapping your dough is required and who isn’t ready to do a bit of slapping by FRIDAY?.
We add garlic and Italian seasonings to our crust from time to time. Let your taste buds guide YOU.
Sauce: just a hint of ground fennel is yummy….try it…just a hint 1/16th -1/8th tsp per cup of sauce????
Cheese: Try a blend of Muenster, Mozzarella and cheddar – to die for! Top with Asiago after it comes out of the oven….so good. Again, you may have different tastes. Use what your family likes.
Toppings: Choose what you like – leave less in the middle (same with cheese and sauce). Put items that burn easily on first.
Equipment:
Use a stone (1/2 inch thick) Pre-heat for 30 minutes in HOT oven before using.
Pizza Screens – OK you can buy these online….I ordered 15 inch pizza screens from Amazon.com ….they work but had to be flattened with a weight when they arrived. The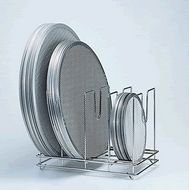 company says they’ll “take steps to fix this”. These really made a difference in our pizza – we used them for the first time this week. We saw improvement with the other steps but this one prevents burning and lets you cook at a higher temp. You put the dough on them, assemble the pizza, slide it onto the preheated brick to bake and then slide it out during the last minute or two of baking….you can then get another pizza ready to go on your screen…slide the pizza from the brick to a cutting board and slide the new screen on to your heated brick…..get the idea here?
When your screens arrive, spray with non-stick food spray (or oil) and bake them in a 350* oven for 20 minutes. Respray with each use.
Pizza Paddle (peel) – we don’t have this – we think it would make moving the hot pizza off the stone easier…..but hey singed eyelashes and nose hairs are an adventure around here.
Oven – 550* oven for 5 – 10 minutes is all it takes. If your oven doesn’t do 550* go as high as you can. I think this is one reason our dough now tastes like “pizzeria” and not “reshaped bread”.
Bake on the lowest shelf that you can. This dough turns out solid all the way through…doesn’t droop when you hold a slice up, isn’t burned, isn’t gooey in the middle….
Really – watching Beverly make pizza was invaluable….and I loved reading about her time with a major pizza company as Director of Quality Assurance and Research Development. If you have $19.95 you will enjoy the downloads click link in first paragraph.
OK we realize that we’ve combined several recipes to come up with the one we like….Beverly Collin’s, Jamin’s (Pizza Hut knock off), and mine (from an Italian friend). How fun. We’ve created our OWN MOTHER/SON RECIPE! As Jamin says, “We DO have something in common!”
American German Pizza Crust (because we are)
Makes 1 16 in pizza
2 12 in pizzas
5 individuals
1/2 C warm (110*) water
½ tsp yeast (this is way less than both of us used to use)
1 T honey (way less sugar than I used to use)
Dissolve the above items.
¾ COLD water
1 ¼ tsp sea salt
2 T olive oil
2 – 3 C flour (use hard, spring, high gluten flour - 14% or higher)
1 tsp garlic powder (Jamin measures – I dump so probably use more)
1 tsp onion powder (same comment)
(opt) Italian Seasoning (for MY pizza I add this rosemary, thyme, sage, oregano, basil – I dump)
If you want more info or photos or whatever – consider buying the download here and let Beverly Collins teach you the trade secrets. You receive an e-Book and a step by step video….plus about 1000 other "top secret" and "blue ribbon" recipes . We really believe this was worth it – as our family now likes the texture etc of our pizza and so we aren’t buying it at Papa Johns. This will save us at least 2K a year. (That info is for Mike because we had to buy a stone, screens and probably a pizza paddle – the oven singes your eye lashes).
First – I think any sauce or crust recipe that you enjoy will be fine (our favorite is below), as long as you use the flour she recommends and the technique. Once again, I was skeptical about this (like the spinach thing) but it really DOES make a difference.
Dough: High gluten, spring flour (grown in northern climates) is what she recommends. 14% protein/gluten or higher. Examples of this are Prairie Gold from Wheat MT or she recommends King Arthur as a good source – choose unbleached, high gluten flour (hard spring wheat).
 Forget bread making – make dough, divide into balls, oil dough, place in Ziploc or airtight container, let rise SLOWLY in fridge for 2 – 5 days. This gives a yummy flavor!!!
Add more oil or don’t knead for softer dough.
Don’t roll the dough. Put your handprint in the dough, start stretching dough out with your fingers from the middle. Tossing the dough helps stretch it too if you are adventuresome. Slapping your dough is required and who isn’t ready to do a bit of slapping by FRIDAY?.
We add garlic and Italian seasonings to our crust from time to time. Let your taste buds guide YOU.
Sauce: just a hint of ground fennel is yummy….try it…just a hint 1/16th -1/8th tsp per cup of sauce????
Cheese: Try a blend of Muenster, Mozzarella and cheddar – to die for! Top with Asiago after it comes out of the oven….so good. Again, you may have different tastes. Use what your family likes.
Toppings: Choose what you like – leave less in the middle (same with cheese and sauce). Put items that burn easily on first.
Equipment:
Use a stone (1/2 inch thick) Pre-heat for 30 minutes in HOT oven before using.
Pizza Screens – OK you can buy these online….I ordered 15 inch pizza screens from Amazon.com ….they work but had to be flattened with a weight when they arrived. The
 company says they’ll “take steps to fix this”. These really made a difference in our pizza – we used them for the first time this week. We saw improvement with the other steps but this one prevents burning and lets you cook at a higher temp. You put the dough on them, assemble the pizza, slide it onto the preheated brick to bake and then slide it out during the last minute or two of baking….you can then get another pizza ready to go on your screen…slide the pizza from the brick to a cutting board and slide the new screen on to your heated brick…..get the idea here?
When your screens arrive, spray with non-stick food spray (or oil) and bake them in a 350* oven for 20 minutes. Respray with each use.
Pizza Paddle (peel) – we don’t have this – we think it would make moving the hot pizza off the stone easier…..but hey singed eyelashes and nose hairs are an adventure around here.
Oven – 550* oven for 5 – 10 minutes is all it takes. If your oven doesn’t do 550* go as high as you can. I think this is one reason our dough now tastes like “pizzeria” and not “reshaped bread”.
Bake on the lowest shelf that you can. This dough turns out solid all the way through…doesn’t droop when you hold a slice up, isn’t burned, isn’t gooey in the middle….
Really – watching Beverly make pizza was invaluable….and I loved reading about her time with a major pizza company as Director of Quality Assurance and Research Development. If you have $19.95 you will enjoy the downloads click link in first paragraph.
OK we realize that we’ve combined several recipes to come up with the one we like….Beverly Collin’s, Jamin’s (Pizza Hut knock off), and mine (from an Italian friend). How fun. We’ve created our OWN MOTHER/SON RECIPE! As Jamin says, “We DO have something in common!”
American German Pizza Crust (because we are)
Makes 1 16 in pizza
2 12 in pizzas
5 individuals
1/2 C warm (110*) water
½ tsp yeast (this is way less than both of us used to use)
1 T honey (way less sugar than I used to use)
Dissolve the above items.
¾ COLD water
1 ¼ tsp sea salt
2 T olive oil
2 – 3 C flour (use hard, spring, high gluten flour - 14% or higher)
1 tsp garlic powder (Jamin measures – I dump so probably use more)
1 tsp onion powder (same comment)
(opt) Italian Seasoning (for MY pizza I add this rosemary, thyme, sage, oregano, basil – I dump)
To the first three ingredients: Add cold water and 2/3 of flour; mix well. Once you have a pancake like batter…set aside for 30 min – 3 hours (can skip this step).
Add oil, salt and spices. Work in enough flour to form stiff dough (firm but slightly yielding). If you choose to knead – knead 8 min by hand or 4 min by mixer. OR you can let it stretch and develop over the days in the fridge. You’ll know your dough is ready when you form it into a ball, set it on the counter and in one minute you see it “relax” but don’t move….sort of like tense muscles relaxing. If your dough flattens out or moves a lot…add more flour and try again.
Oil the balls, put them in Ziploc, and put them in fridge until doubled or more…2 – 5 days. During this time the dough ferments and you get wonderful flavor and texture.
Top with your toppings….use less sauce, cheese and toppings in the middle.
Bake at 550* on pizza screen and preheated brick (see above notes) for 7 – 10 minutes. Check in 2 – 4 minutes to see if bubbles are forming and pop if you don’t want bubbles. This turns out browned but not burned, you can pick a piece up at the corner and it doesn’t droop or fall apart. You can eat it with your fingers and don’t need a fork…it isn’t gooey in the middle. In other words – keep it low and slow. Keep it cool. The slow rising makes a PIZZA crust texture instead of bread with sauce on it texture.
FYI a friend stationed in Italy said they bake their pizza in 700* ovens for 2 – 4 minutes.

4 comments:
This is pretty cool! I'm going to try your recipes although I'm not sure I'll spring for the special equipment.LOL My kids aren't very picky and I'm sure that they would be happy with something close to a pizza place. Thanks for posting all these tips and recipes! I'm excited!LOL
Blessings,
Lisa
I'm definitely trying this! I'm with Lisa that I probably won't spring for the extra stuff just yet, but I do have a rectanglar stone that we can use. :) Thanks for posting this! I'm just bummed that we had pizza last night so that I can't try it until next weekend. (But, that means I can make it in and stick it in the fridge.... always an upside!)
And thanks for the reminder to choose joy. We're needing a lot of that these days with dh's company situation.
We tried it for two weeks with just the fridge, higher oven temp and stone...Jamin is sort of well obsessive when he latches on to something and liked the change but not enough. The screens DO make a difference...they allow the pizza to be cooked very HOT and not burn...because the dough isn't on a pan....
Mmmmm can't wait to try some of these new ideas. Sounds like I was getting it all wrong EXCEPT I don't roll out my dough but flatten it with my hands and punch it ocassionally and toss it around just a bit. I was getting one thing right anyway!
Post a Comment